Introduction to Revit and BIM
Due to 3D modeling architectural industry has been revolutionized. Most people think Revit and BIM are the same and this led to much confusion. A 3D model might be known as BIM and also as a Revit model but Revit is not BIM. Let’s make that clear from the start. BIM is not an application. Some people have wrongly thought of BIM as software that designs 3D models, but it is not so. BIM, in itself, does not design anything.
The Application usage may appear to be similar for Revit and BIM technology, but we cannot confuse the two. BIM is the model-based process for creating and managing building and infrastructure, for this REVIT is a foundational asset or tool that helps to create the required 2D and 3D designs. The difference between Revit and BIM is not complex to understand. It just requires some clarifications.
What is BIM?
Building information modeling (BIM) is a methodology used to design, construct, and operate. It is rapidly transforming the design and production process in the architecture, engineering, and construction industry. BIM is an intelligent model-based process that provides insights for creating and managing building and infrastructure projects faster, more economically, and with less environmental impact. It includes every set or list of
- Visualization
- Simulation and
- The collaboration that uses rich information in intelligent models to inform better decisions.
What is Autodesk Revit?
Revit is a professional software used in the business industry in order to design 3D models, 2D drafting, maps, and plans
It is a cloud-based analyzed tool which is powered by Autodesk. Revit was planned to allow architects to design and analyze a building by creating a model or site that included both modeling and drafting, which is also known as Building Information Modeling or BIM. Autodesk Revit is an incredibly powerful tool for architects, drafters, structural engineers, MEP engineers, designers, and more.
Autodesk Revit is a 3D parametric modeling software for building information modeling (BIM). Parametric modeling means you can create each of the following from within the tool, providing a single database for all the elements involved in your design. With this, you can store all the information in one place. As a result, any information that gets changed is automatically changed throughout the model
You can learn how to design, analyze, and create documentation for every phase of the building. Before this software or tool came into existence people used to draw manually or they used to design in AutoCAD, and if something went wrong you have to erase it and you have to update everything again regarding drawing. With Revit, you can make a change in one design, and the program will immediately update the other areas for you.
Because Revit lets you work in 3D, it’s easier for the client and builder to check out and visualize the home or building. You can quickly create realistic images by rendering designs, you can perform digital walkthroughs, and provide rich presentations. This enables your team to correct any mistakes and update your model before construction begins.
Revit supports DWG, DWF, DXF, IFC & DGN with this you can easily import, export, and link your data with your industry, so you can easily work with your clients, consultants, and other building professionals.
What you will learn
This series of posts will help you to understand the basics of Revit and BIM. We will show you how to use the components in it and add layers of intelligence to help analyze and build your design
These models are not the same ones used in CAD (points, lines, curves). The software manipulates the work very easily. Walls, for instance, join and bisect automatically, connecting layers to layers. Many of the advantages are obvious—for instance, changes made in elevation transmit automatically to every plan, section, callout, and rendering of the project. You will learn how to design the interior and exterior of the building.
The primary objective of this course is to teach the concepts of building information modeling and introduce the tools for parametric 2D and 3D building design and documentation using Revit Architecture. In the end, you will able to:
- Describe the benefits of building information modeling
- Use the fundamental features of Revit Architecture
- Revit interface and Views
- Set up a Project • Creating walls
- Adding doors and windows • Adding Floors and ceilings
- Loading families
- Adding a roof
- Adding stairs
- Creating a shadow study
- Designing roads
- Rendering a building
You will learn how to use the features of Revit Architecture to design, change, and document a building. You learn how you can make changes in any view of the building.
BIM design marks a fundamental advance in computer-aided design. As the tools improve, ideas spread, and students become versed in the principles, it is inevitable that just as traditional CAD has secured a deserved place in every office.
Revit file types
There are three types of file types
- Project files: in this you can create a building model, and this is a .rvt extension
- Template files: this are used to create a project and family files which is a .rte and .rft extension
- Family files: this files are used to create a doors, windows, title blocks,annotation, symbols,which are loaded into the project file, this have a .rfa extension
What are the project and project template files?
Template(.rte) and project (.rvt) files are actual Revit projects.
project files

-Project files are in ‘.rvt’ extension which can be created with or without using a template and this can be customisable. This provides important information about building models, like size and placement of the components, materials which you used, annotations, etc..
What are the project template files?
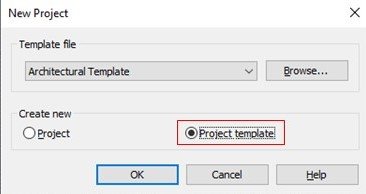
-Though this template is in the ‘.rte’ extension it cannot be customized. These Templates are the default project units and settings, in this, we can see default system families like walls, floors, and other and preloaded components. You can select a template from the template library or a saved project can be used as a new project template.
- Project templates are .rte extension, they are stored in a template folder as the imperial and metric library folder
- The settings for Views, levels, materials, and annotations using project templates can be modified.
- Elements like sheets, drafting view and details, schedules, additional families, cameras, groups, detail groups, links, import, or export settings can be created within project templates.
Start Without using a project template file
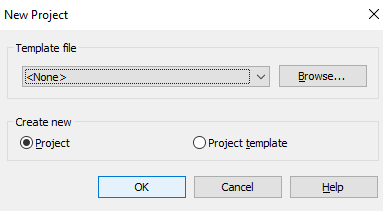
-You can start a project without using a template. So, select ‘None’ in the template file but in this, you will not have any elevation view, no doors, no windows, and no other components. It contains only one plan view and ceiling plan. In this, you have to use specific units like imperial or metric units.
Families
These families contain groups of elements with a common set of properties. Different elements may have different values but the set of property parameters is the same.
Families are of three types
- System families
- Loaded families
- In-place families
System Families
System families create basic elements that you would assemble on a construction site.
Ex: walls, roofs, floor, System settings, which affect the project environment and include types for levels, grids, drawing sheets, and viewports, are also system families.
System families are defined in advance in Revit. You do not load them into your projects from external files, nor do you save them in locations external to the project.
Loadable Families
Loadable families are families used to create the following:
- Building components such as windows, doors, casework, fixtures, furniture, and planting are installed in and around a building. If not available you can download for free or that would be purchased.
- System components such as boilers, water heaters, air handlers, and plumbing fixtures are delivered and installed in and around a building. If not available you can download it for free or that would be purchased.
- Some annotation elements that are routinely customized, such as symbols and title blocks
Because of their highly customizable nature, loadable families are the families that you most commonly create and modify in Revit. Unlike system families, loadable families are created in external RFA files and imported, or loaded, in your projects. For loadable families that contain many types, you can create and use type catalogs, which allow you to load only the types that you need for a project.
In-Place Families
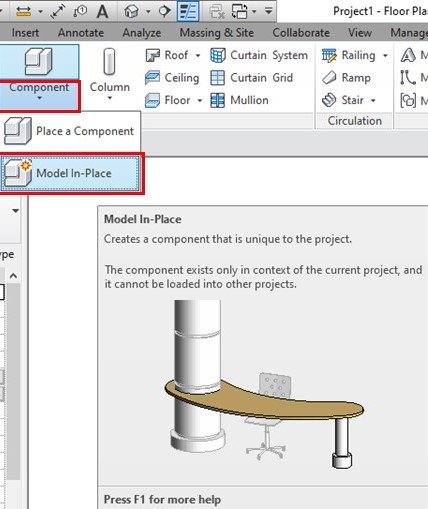
-This is also known as model In-place, these elements are very different from others, you can create any type of component as per your choice or as per your need. You can resize, adjust accordingly the model in-place families. When you create an in-place element, Revit creates a family for the in-place element, which contains a single-family type.
User interface
Revit is a powerful application that uses BIM methodology. It has a toolbar, menubar, dialogue boxes, and windows using this you can perform various tasks.
Revit architecture is similar to windows based application that utilizes the Microsoft Office ribbon interface
or
The applications which are utilized in the Microsoft Office ribbon interface similar interface used in Revit architecture
Recent Files
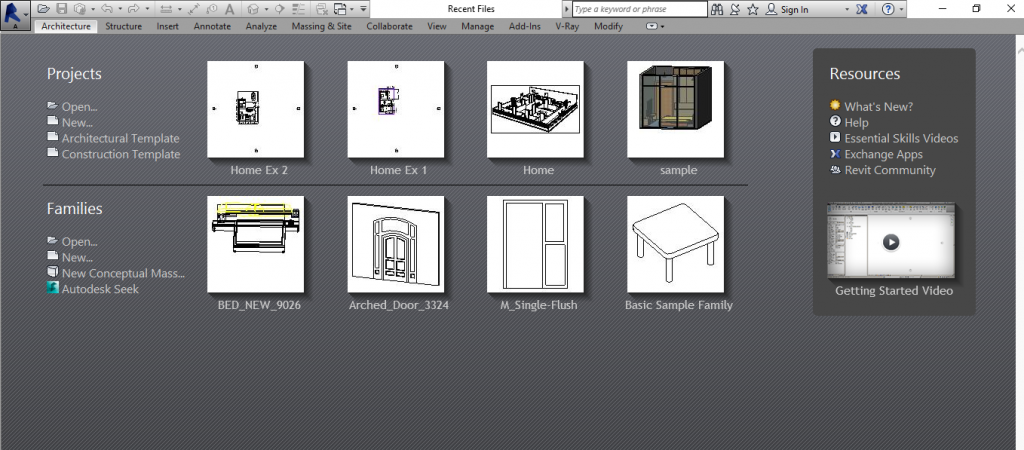
When you open Revit software you will see this window. You can see here there are two different types of files project and families, and one resources block
Project: You can create a new project as well as you can open a recent project that you have been working on which is listed on the right side.
Families: you can create a new family as well as you can open a recent family.
Resources: this will provide access to additional resources on learning Revit.
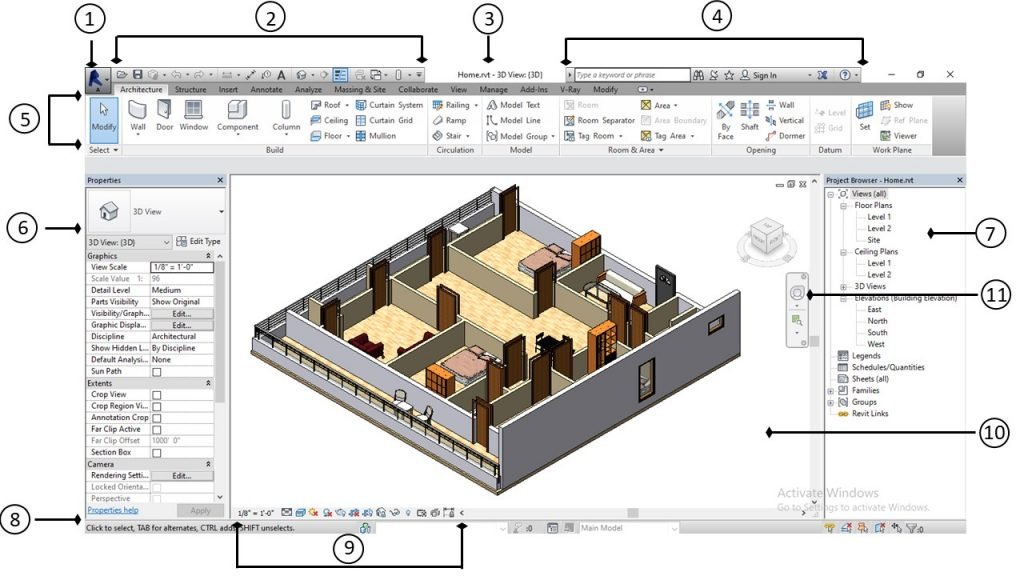
Primary user interface
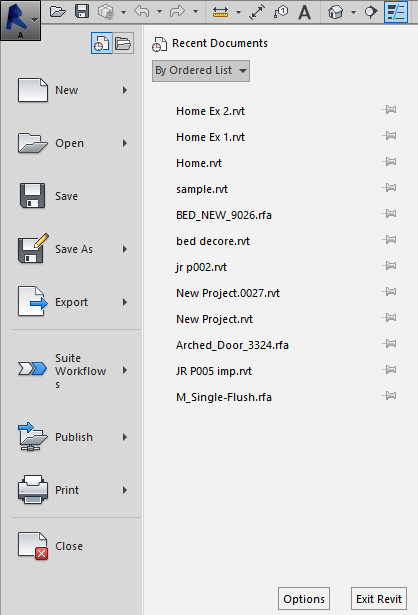
-This provides access to open files such as Open, New, Save as, Export, Publish, Print, and close.
Quick access tool(QAT)
If you want to customize Quick access tools according to your workflow or requirements, then follow these steps below.
Step-1

-Right-click on any of the tool to add to QAT
Step-2

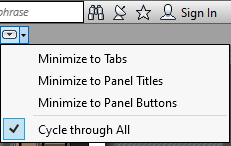
-Right-click on any f this tool to remove or customize this ribbon
Step-3
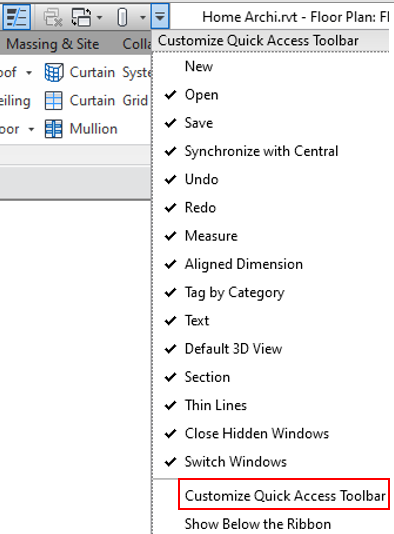
-Click on Customize QAT
Step-4
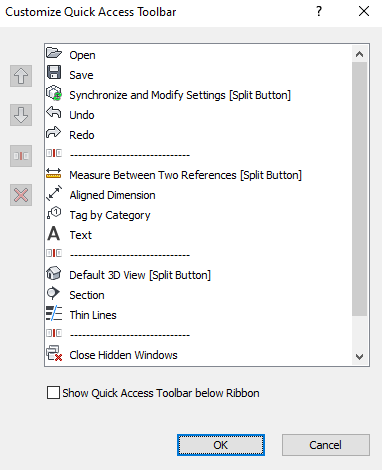
-Quick access toolbar contains a set of default tools. You can customize this toolbar to display the tools on the window in the menu bar that you use most.
3. Title bar

-Displays the current project name and in which view you are.
4. Info center

-InfoCenter provides a set of tools that enable you to access many product-related information sources. Depending on the Autodesk product and the configuration, these tools might differ.
5. Ribbons tab

-The visible portion is a ribbon tab
-Ribbons are the initiating command in Revit to help you in defining your project.
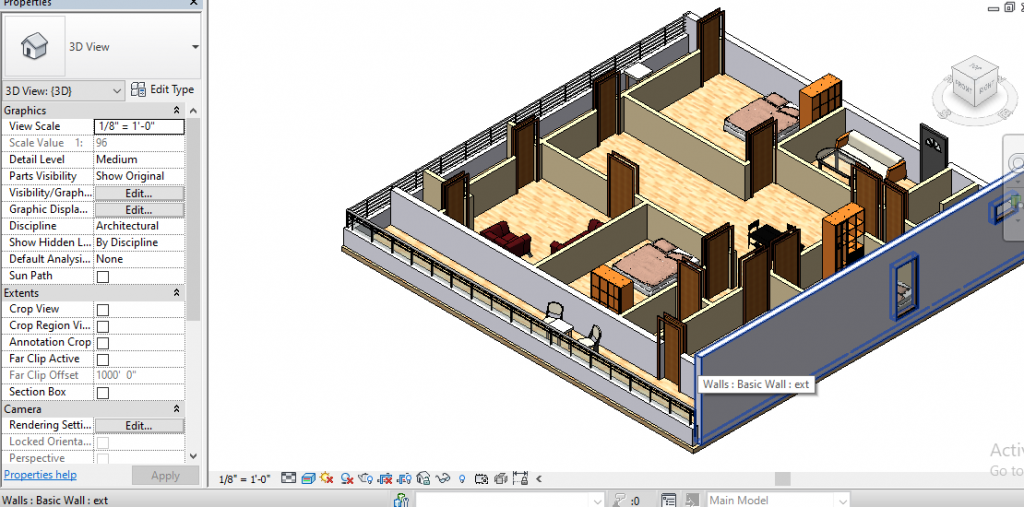
6.Properties
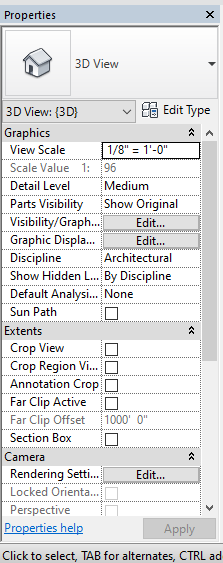
-In this properties palette you can view and modify or edit different elements.
7. Project browser
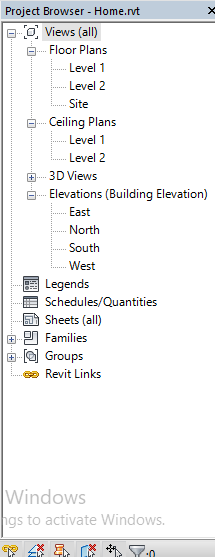
-This project browser shows plans, elevation, etc on a particular Revit project, and from this panel, you can control or modify your design.
8. Status bar
-This Displays the status of any element or family when you put the cursor on it.
9. View control

-This used to control the graphical display of the current project.
10. Drawing area
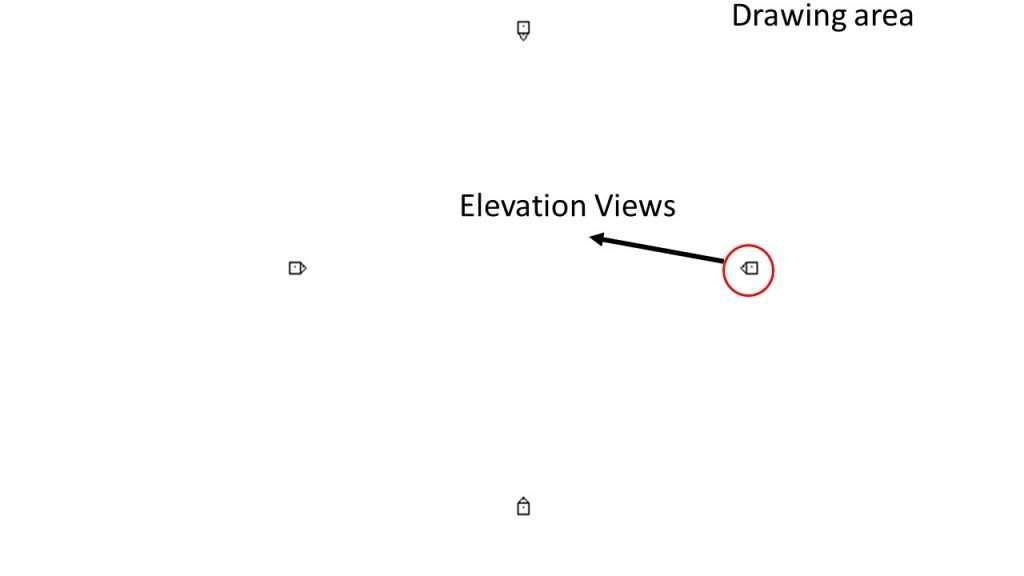
-The drawing area is used to design and modify your projects and families.
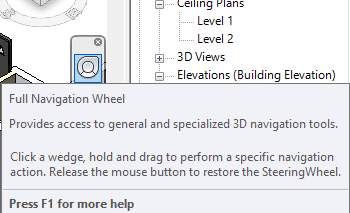
-The navigation wheel is used to display the 3D view of your project.
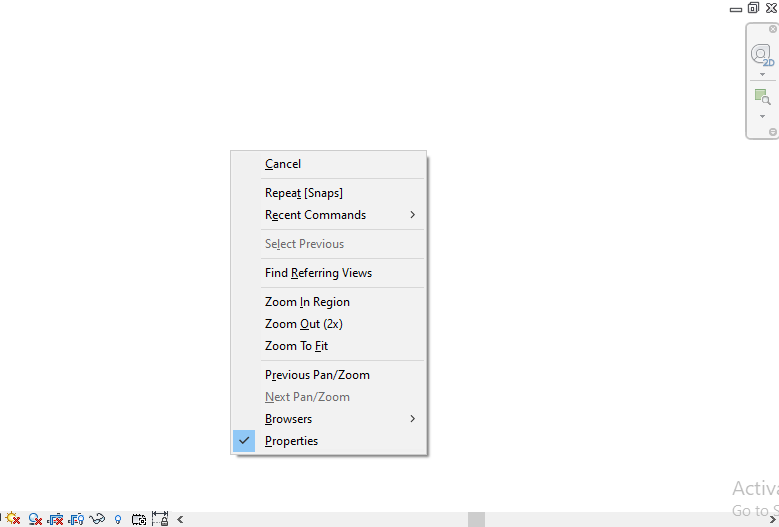
-The context menu that includes the Repeat and Recent Commands tools. It appears when you right-click in the open space of the drawing area.
So, subscribe to our newsletter to be notified about upcoming Revit tutorials.